Introduction
The company I work for has changed its device usage policy, and now it doesn’t allow company devices for personal use. So, I decided to buy a mini PC to setup a small homelab server, and migrate my personal data to it. Also, I wanted to start de-googling by having all my and family photos to it. This was my summer project this year.
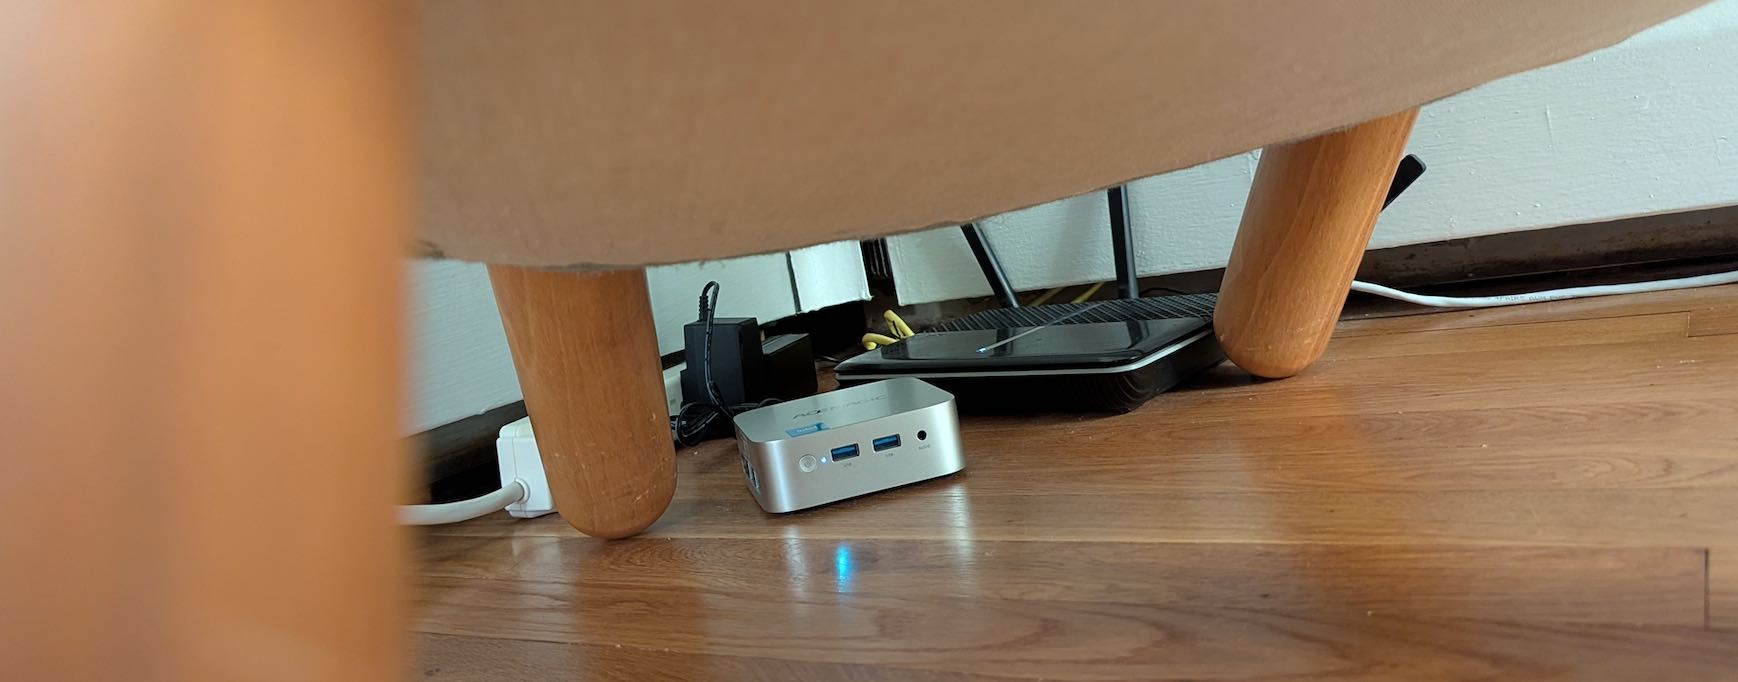
Mini PC for homelab server
I bought AceMagic’s this mini PC for less than $200. I was pleasantly surprised at how small it is. It has Intel N150 processor, 16GB DDR4 RAM and 1TB S-ATA SSD. It’s not powerufl, but the beauty of N150 is its low power consumption, thus low electricity cost and also it’s relatively silent.
It seems that AceMagic once had malware in its PCs, but I was not concerned as I intended to initialize its entire storage from the beginning. Good-bye, pre-installed Windows 11.
Overview
Proxmox 8.4.0 is running as a hypervisor so that I can use its snapshot and backup features. Even if you have a single VM like I do, I recommend to have a hypervisor for these purposes.
As a main OS, I have a Ubuntu VM (24.04.2 LTS). I assigned 12GB RAM and 800GB+ storage to it. On the Ubuntu VM, I deployed services with mostly docker compose.
- Caddy - Web server and reverse proxy with automatic cert renewal
- porkbun-ddns - Dynamic DNS (DDNS) tailored for porkbun-provided domain names
- Immich - Google Photos alternative
- Pi-hole - DNS with network-wide ad-block; this is deployed directly on Proxmox as CT
- RomM - ROM manager for old game consoles
I put my personal data to the VM. Many of them are .org files, and I can view/edit them from Emacs on my laptop using tramp. If I need to use a browser on the VM, I either I use console on proxmox or use X2go to show the browser window on my laptop.
I take snapshots of the Ubuntu VM regularly. I (less frequently) backup the entire proxmox (incl. the VM) to an external USB disk, and to an encrypted pcloud folder with rclone. These are all manual procedures for now, but it’s not too bad as I have only one server to take care of.
Installing proxmox
As a homelab server, I plan to do a lot of tinkering. So, the snapshot feature of proxmox is very convenient for when I need to roll back the Ubuntu VM to a healthy state. Yes, it’s adding another complexity (and probably overhead). But what you’ll get is much more than minor inconveniences.

Many people might prefer VMware to proxmox now that VMware is free again. But I don’t trust VMware anymore. After all, proxmox is open source.
Installing proxmox was very easy.
- Download its ISO image from here, and write to a USB memory. I did it from my laptop (MacBook).
diskutil list
# Insert USB memory
diskutil list # You'll find a new device (/dev/diskN) and it's the USB memory
diskutil unmountDisk /dev/diskN
sudo dd if=/path-to.iso of=/dev/rdiskN bs=1m # Don't forget 'r' in rdisk
diskutil eject /dev/diskN
# Safe to pull off the USB memory
- Connect the USB memory, keyboard and mouse to the mini PC. Connect it to a display/TV with a HDMI cable. Connect it to the wifi router with an ethernet cable.
- Power on the mini PC.
- Keep pushing ESC/Delete keys, and then you’ll see the BIOS screen. Update the BIOS to enable boot from USB memory.
- Just follow instruction on screen. Assign a fixed IP address to the mini PC.
Then, you’ll see proxmox boots. After registering root password, you can log in to proxmox management console at http://<IP address>:8006. You don’t need keyboard, mouse or display anymore.
Ubuntu VM
I use Rocky Linux at work and have more experience on RedHat linux, but I decided to install Ubuntu (desktop) for the homelab PC. I feel that they are not much different. It’s just that I’m not used to apt yet.
- Log in to proxmox management console > local(disk) > ISO Images
- > Download from URL > specify URL (24.04.2 LTS) > Download > (wait)
- > Create a VM > Name: <your-VM-name> > Next
- > ISO Image: specify the downloaded ISO > Next > Next
- > Disk size: I specified 820GB > Next > Cores: 4 > Memory: 12GB
- > Next > Next > Finish
I left 4GB memory and 100GB storage for proxmox and CTs, but I now feel I should have specified a smaller disk size…
To install Ubuntu, just follow the installer. I assigned a fixed IP address for the VM as it’s a server. Then,
sudo apt update -y
sudo apt upgrade -y
# Install openssh
sudo apt install openssh-server openssh-client
Then, I setup password-less ssh from my laptop to the homelab server.
ssh <user>@<Ubuntu VM IP> # to confirm can ssh
# enter password here
exit # back to MacBook
cd ~/.ssh
ssh-copy-id -i <id_rsa> <user>@<Ubuntu VM IP>
# enter password again
ssh <user>@<Ubuntu VM IP> # confirm if can ssh w/o password
Docker
Setting up Docker. Deploying services with docker-compose is very easy.
sudo apt install apt-transport-https ca-certificates curl software-properties-common
curl -fsSL https://download.docker.com/linux/ubuntu/gpg | sudo apt-key add -
sudo add-apt-repository "deb [arch=amd64] https://download.docker.com/linux/ubuntu focal stable"
apt-cache policy docker-ce # to check
sudo apt install docker-ce
sudo systemctl status docker
sudo usermod -aG docker ${USER}
# reboot
docker run hello-world
Immich
Immich is a Google (or Apple or whatever) Photos alternative and it’s surprisingly good. All photos and videos are synched directly from your mobile devices to your server. It even has AI features like face-recognition and searching photos with words. And if you expose it to the Internet, you can access your photos and videos from anywhere in the world (w/ internet connectivity, of course).

Deployment is easy. Just follow: https://immich.app/docs/overview/quick-start/
wget -O docker-compose.yml https://github.com/immich-app/immich/releases/latest/download/docker-compose.yml
wget -O .env https://github.com/immich-app/immich/releases/latest/download/example.env
# Edit .env and specify timezone (TZ) and location to upload photos
docker compose up -d
That’s it. It is extremely easy, isn’t it? Let’s register your account and upload photos and videos from your mobile device.
Expose homelab server to Internet
Exposing your server to the Internet involves several steps and is generally considered risky. Using a reverse proxy is one way to secure your server from malicious attacks from hackers.
Obtain a domain
I obtained a domain from porkbun. I bought achiwa.co.uk for under $3 for the first year. The renewal cost would be $6 if I’d like to keep it. I chose co.uk domain simply because it was cheap.
Setting up DDNS
Unless you buy a static IP address from your internet provider, you’d be likely to get a dynamic IP address. DDNS (Dynamic DNS) is a service that automatically updates a new IP address for a domain name when the IP address is changed.
Fortunately, I found porkbun-ddns which is a DDNS service specifically designed for domain names purchased from porkbun. You can deploy it with docker-compose. Create a directory for porkbun-ddns and docker-compose.yml in it:
services:
  porkbun-ddns:
    image: "mietzen/porkbun-ddns:latest"
    container_name: porkbun-ddns
    environment:
      DOMAIN: "<domain>" # Your Porkbun domain
      SUBDOMAINS: "<subdomains>" # Subdomains comma spreaded
      SECRETAPIKEY: "sk1_<secret key>" # Your Porkbun Secret-API-Key
      APIKEY: "pk1_<API key>" # Your Porkbun API-Key
      # PUBLIC_IPS: "1.2.3.4,2001:043e::1" # Set if you got static IP's
      # FRITZBOX: "192.168.178.1" # Use Fritz!BOX to obtain Public IP's
      # SLEEP: "300" # Seconds to sleep between DynDNS runs
      # IPV4: "TRUE" # Set IPv4 address
      # IPV6: "TRUE" # Set IPv6 address
      # DEBUG: "FALSE" # DEBUG LOGGING
    restart: unless-stopped

# # Uncomment below to let it detect ipv6 address:
#     networks:
#       - ipv6_enabled

# networks:
#   ipv6_enabled:
#     enable_ipv6: true
This was from README on the github page. APIKEY and SECRETKEY need to be generated and obtained from porkbun portal.
Then, run:
docker compose up -d
Deploying Web and reverse proxy server
As a web server, nginx is more popular. But I prefer Caddy as it’s very easy to setup, and it has a killer feature of automatic certificate deployment/renewal.
As a server exposed to the Internet, my homelab server needs to have a valid server certificate. As server certs typically expire within a year, it’s been headaches for many admins to renew server certs. Caddy automates this process for you by automatically acquiring certs from Let’s encrypt.
With Caddy, I can safely expose web services (eg, Immich) to the Internet. I only expose this blog and Immich to the Internet for now.
Caddy can also be deployed with docker-compose. Create docker-compose.yml:
services:
  caddy:
    image: caddy:latest
    restart: unless-stopped
    ports:
        #- "29753:29753"
        #- "2283:2283"
        - "80:80"
        - "443:443"
        #- "443:443/udp" # For HTTP/3
    volumes:
      - ./conf:/etc/caddy # Mount your Caddyfile for configuration
      - /<path-to-hugo-public/folder>:/srv # Mount directory for serving static files
      - caddy_data:/data # Named volume for Caddy's persistent data
      - caddy_config:/config # Named volume for Caddy's configuration

volumes:
  caddy_data:
  caddy_config:

networks:
  default:
    name: immich_default
    external: true
I specified the default network to use Immich’s default network so that Caddy can properly forward requests to Immich. Without this, Caddy can’t see Immich.
Then, configure reverse-proxy for Caddy to Immich. Create Caddyfile in immich/conf.
<subdomain for immich>.achiwa.co.uk {
    reverse_proxy immich-server:2283
}

# This is to expose blog files
blog.achiwa.co.uk {
    root * /srv
    file_server
}
Router settings
Even if you are not exposing anything to the Internet, your router’s IP address can be accessed from anywhere around the world. However, your router by default blocks all incoming accesses from the Internet.
To expose services to the Internet, you need to setup port forwarding to your router. In my case, I needed to configure my old TP-link wifi router.
- Visit http://192.168.0.1/ > Log in to the management console
- > click Advanced tab > NAT forwarding > Virtual Servers > Add
- > External Port: 443, IP address: put your server’s IP address
- > Internal Port: 443 > OK
Now, all incoming access to your router’s IP address port 443 will be forwarded to your server’s IP address port 443. These could include attack attempts from hackers. Be careful!
Then, move back to immich directory and run:
docker compose up -d
Test
You can disable wifi on your mobile phone and test connecting to Immich. Open browser and visit: https://<subdomain for immich>.<your domain>. Can you see Immich’s login screen?
To troubleshoot, you can look at Caddy logs:
docker compose logs caddy
Blog
As Caddy is already configured to expose the blog site, all I needed was to prepare its contents. I write blog articles in a .org file and convert it to markdown files with ox-hugo, and then further convert them to html and other files with hugo.
I described this in my previous post.
Pi-hole
Ad-blocker is great for my mental health when reading web pages. My main browser is Firefox with uBlock Origin. I can’t think of a world without ad-blockers anymore.
Pi-hole is a DNS with network-wide ad-blocker. I deployed it as a CT on proxmox because I wanted to use pi-hole from Ubuntu VM on the homelab PC.

Deployment was quite easy thanks to the helper script. Open proxmox console and run:
bash -c "$(curl -fsSL https://raw.githubusercontent.com/community-scripts/ProxmoxVE/main/ct/pihole.sh)"
From CT > Network, assign a fixed IP address for Pi-hole. Then, set root password from CT > Console:
/usr/local/bin/pihole setpassword
You can use the IP address as the DNS server on devices and also for the router DHCP server.
If you use Gooble Chrome, you can force it not to use Chrome’s own DNS settings. Type and visit from Chrome:
chrome://settings/security?search=dns
and disable Use secure DNS.
RomM
RomM is a ROM manager for retro games. It uses JavaScript port of RetroArch emulator on browsers to play games. This means that RomM is very light-weight for the server. You need to prepare ROM data yourself.

Follow this Quick Start Guide to deploy and configure RomM.
I found that sound is awful on Firefox. For better experience, use Google Chorme.
Finally
So far, I’m very satisfied with my homelab server. It’s not fast but it is good enough for what I want it to do.
I’d like to write about how I backup the homelab server in the next article.